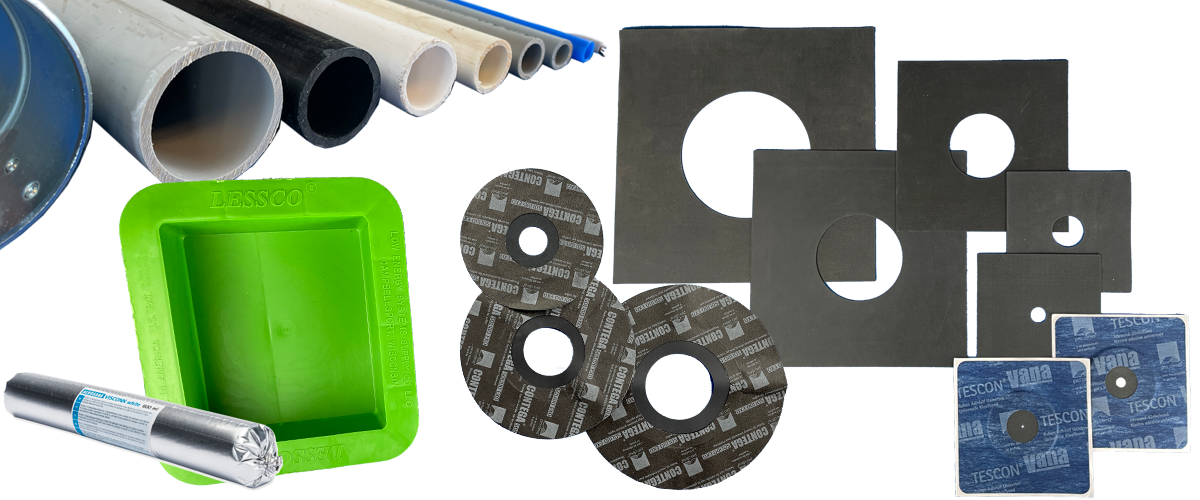

In even the tightest building envelope there will always be intentional holes in the air barrier. Common penetrations are plumbing pipes, vent pipes, wire penetrations, and outlet boxes. 475 offers a wide variety of simple and effective gaskets from Pro Clima for airsealing and waterproofing around wire and pipe penetrations. The Pro Clima naming conventions are displayed here:

KAFLEX = wire penetrations
ROFLEX = pipe penetrations
SOLIDO = integrated CONTEGA SOLIDO tape
Number = approximate size of pipe diameter in millimeters
You’ll notice the KAFLEX gasket, ROFLEX 20 gasket, and all three of the ROFLEX SOLIDO gaskets have integrated tape, while the ROFLEX 30 through 200 are simply square-edged pieces of EPDM and require tape to be applied. We recommend TESCON VANA tape to apply these ROFLEX gaskets, which is the tape integrated into the ROFLEX 20 and KAFLEX. The ROFLEX SOLIDO line of gaskets are integrated with round pieces of airtight, watertight, vapor-open CONTEGA SOLIDO tape, which is fleece-backed so that it can hold a plaster and has an adhesive that bonds to masonry without need for a primer.
Advantages of using gaskets for sealing around wires and pipes:
(1) The wire/pipe can be adjusted after the gasket is installed. Gaskets are made of EPDM membrane with holes cut smaller than the penetration diameter so there’s a friction fit around the wire/pipe.
(2) Gasket seals are easy to visually inspect for proper install.

Regardless of the gasket, it’s important to leave space around the wire/pipe penetration to allow the “elbow-room” for taping. If the gasket lands next to a wall, framing member or service cavity batten, you may need to consider sequencing of those elements to allow for easy application of the gasket onto a surface that is free and clear.
Specifying The Right Gaskets
This table shows what size penetration the gasket seals, as well as the outer dimensions of the gasket.
| GASKET SIZING AND DIMENSIONS | ||
|---|---|---|
| Gasket Name | Range of Pipe Sizes Measuring Outside Diameter ∅: inch (mm) | Gasket Outer Edge Diameter: inch (mm) |
 |
43/4” ↔ 57/8” (120 ↔ 150mm) |
Diameter: 115/8” (296mm) |
 |
31/2” ↔ 43/4” (90 ↔ 120mm) |
Diameter: 93/4” (250mm) |

|
2” ↔ 31/8” (50 ↔ 80mm) |
Diameter: 77/8” (200mm) |
| Gasket Name | Range of Pipe Sizes Measuring Outside Diameter ∅: inch (mm) | Gasket Outer Edge Dimension: inch (mm) |
 |
63/4” ↔ 83/4” (170 ↔ 220mm) |
117/8”x 117/8” (300mm x 300mm) |

|
43/4” ↔ 63/4" (120 ↔ 170mm) |
93/4” x 93/4” (250mm x 250mm) |
 |
4” ↔ 43/4” (100 ↔ 120mm) |
77/8” x 77/8” (200mm x 200mm) |
 |
2” ↔ 31/2” (50 ↔ 90mm) |
51/2” x 51/2” (140mm x 140mm) |
 |
13/16" ↔ 2” (30 ↔ 50mm) |
51/2” x 51/2” (140mm x 140mm) |
 |
5/8” ↔ 13/16" (15 ↔ 30mm) |
56/8" x 56/8" (145mm x 145mm) |
 |
1/4” ↔ 1/2” (5 ↔ 12mm) |
56/8" x 56/8" (145mm x 145mm) |
In the case of unique penetration sizes, EPDM gaskets can be custom cut on-site. Installers can trace the inner circle of the pipe penetration and then cut this shape out of a piece of EPDM membrane (pond liner). Typically, cutting the pipe diameter from the inner shape will create a friction fit on the outer diameter when installed, but this should be verified on-site.

Liquid-Applied Airsealing
Another option for airsealing around wire and pipe penetrations is using VISCONN liquid-applied air barrier to airseal the edges and joints between the air barrier and the wire or pipe. The substrates should be stable for this application and the wire or pipe cannot be adjusted later, as they can when using a gasket. VISCONN can be sprayed on or brush-applied. Depending on the gap between the penetration and the air barrier substrate, it can be best to use VISCONN FIBRE (spans gaps up to ¾”) for this application since it’s designed to bridge larger gaps than the standard VISCONN (spans gaps up to ⅛“). VISCONN should be liberally applied around the penetration as well as the air barrier and turn up the wire/pipe and air barrier at least a ½”. Greater care should be taken to inspect liquid-applied airsealing because this approach is at greater risk for damage over its lifetime.

VISCONN can be installed over any Pro Clima tapes or and the adhesive used on Pro Clima tapes can be installed over VISCONN. For best results, redundancy - using both tape and liquid-applied air seal - will ensure the greatest results.
Using Tape In a Pinch
TESCON VANA tape can be used to airseal around wires and pipes. For wires it’s a quick and simple install: pinching tape on either side of the wire penetration and apply the tape to the substrate. This is reliable and waterproof, but the downside to this method is that your wire is no longer moveable, the way it would be using a KAFLEX gasket.

Taping around pipe penetrations can be a difficult install. There needs to be small patches of tape overlapping and feathering around the pipe.

For projects with an interior air barrier (such as INTELLO PLUS or INTELLO X) it’s best practice to use a service cavity to limit the number of interior air barrier penetrations. See this blog post on the importance of a service cavity.
No Service Cavity? Plan For Every Outlet.
For interior air barrier projects without a service cavity there will be air barrier penetrations at electrical outlet boxes and/or ceiling lights. For these penetrations it’s best to locate the electrical outlet within an airtight outlet box – pinching tape to airseal the wire penetration into the airtight box and then taping the edges of the airtight box to the air barrier. 475 offers the LESSCO box for this application. The LESSCO is a hard plastic box that can be used on the interior or exterior.

Step-By-Step Installation of LESSCO Box:


Take-Offs And Planning For Penetrations
It’s best to review construction documents and make a list of all known penetrations and their pipe diameters or wires. Many multifamily and commercial projects have an “air boss” on their job sites and all air barrier penetrations or damage needs to be reported to the “air boss”.
